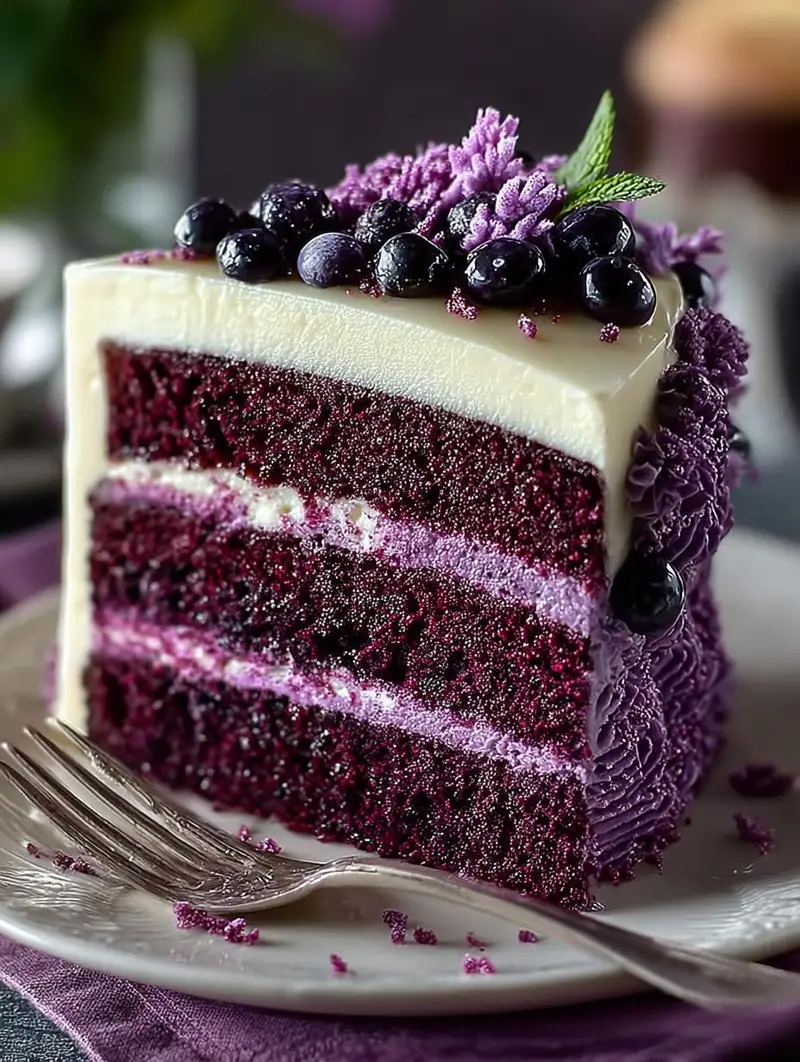
Purple Velvet Cake Rich is a vibrant culinary masterpiece that I absolutely adore. This cake features stunning purple layers that boast a tender, moist crumb, generously coated in a luscious, creamy white chocolate frosting. Each bite is a delightful experience, perfect for celebrations or simply indulging in something special. Whether it’s a birthday, wedding, or just a treat for yourself, this cake never disappoints!
Why You’ll Love This Purple Velvet Cake Rich
This Purple Velvet Cake is a standout dessert for many reasons. First, its unique color creates a visual feast that impresses guests. Second, the combination of rich flavors and textures makes it a decadent purple velvet cake that is hard to resist. Third, its moistness ensures a delightful experience with every slice. Fourth, it’s versatile enough to be paired with various frostings, such as cream cheese frosting for purple velvet cake or buttercream frosting. Fifth, this cake is relatively easy to make, making it accessible for bakers of all skill levels. Finally, the purple velvet cake recipe is perfect for any celebration, adding a touch of elegance to your dessert table!
Ingredients for Purple Velvet Cake Rich
Gather these items:
- 2 ½ cups (300g) all-purpose flour, sifted
- 1 teaspoon baking soda
- 1 teaspoon salt
- ½ cup (113g) unsalted butter, softened
- 1 ¾ cups (350g) granulated sugar
- 2 large eggs, room temperature
- 1 teaspoon pure vanilla extract
- 1 cup (240ml) buttermilk, room temperature
- 1 tablespoon white vinegar
- 2 teaspoons purple gel food coloring
- ½ cup (120ml) hot water, divided
- 1 tablespoon unsweetened cocoa powder
- 12 ounces (340g) good quality white chocolate, chopped or chips
- 2 cups (450g) unsalted butter, softened
- 4-5 cups (480-600g) powdered sugar, sifted
- 1 teaspoon pure vanilla extract
- ¼ cup (60ml) heavy cream or whole milk, cold
- Pinch of salt
How to Make Purple Velvet Cake Rich Step-by-Step
- Step 1: Preheat oven to 350°F (175°C). Grease, flour, and line three 8-inch round cake pans with parchment paper.
- Step 2: Whisk together sifted all-purpose flour, baking soda, and salt. Set aside.
- Step 3: In a small bowl, whisk 1 tablespoon unsweetened cocoa powder with ¼ cup hot water until smooth.
- Step 4: Cream ½ cup softened unsalted butter and 1 ¾ cups granulated sugar until light, fluffy, and pale (3-5 minutes). Beat in 2 large eggs one at a time, then 1 teaspoon pure vanilla extract.
- Step 5: Combine 1 cup buttermilk and 1 tablespoon white vinegar. Stir in 2 teaspoons purple gel food coloring until uniform. Next, stir in the prepared cocoa paste.
- Step 6: With mixer on low, alternately add dry ingredients and purple buttermilk mixture to the wet ingredients, starting and ending with dry. Mix until just combined; do not overmix.
- Step 7: Gently fold in the remaining ¼ cup hot water until the batter is smooth and uniformly purple.
- Step 8: Divide batter evenly among prepared pans. Bake for 25-30 minutes, or until a wooden skewer inserted into the center comes out clean.
- Step 9: Cool cakes in pans on a wire rack for 10-15 minutes. Invert, remove parchment, and cool completely on the rack.
- Step 10: Melt 12 ounces chopped white chocolate gently until smooth. Set aside to cool to room temperature.
- Step 11: Beat 2 cups softened unsalted butter on medium-high speed for about 5 minutes until incredibly light, pale, and fluffy.
- Step 12: Gradually add 4-5 cups sifted powdered sugar on low speed, beating until fully incorporated after each addition. Increase speed to medium-high and beat for another 3-5 minutes until thick and creamy.
- Step 13: Stir in 1 teaspoon pure vanilla extract and a pinch of salt. Gradually pour in ¼ cup cold heavy cream or milk, one tablespoon at a time, beating on medium-low speed until frosting reaches desired consistency.
- Step 14: With the mixer on low speed, slowly pour in the cooled, melted white chocolate. Beat until just fully incorporated and the frosting is smooth and uniform.
- Step 15: If necessary, use a serrated knife to level any domed tops off the cooled cake layers.
- Step 16: Place one leveled cake layer on a serving plate. Spread about 1 cup of white chocolate frosting evenly to the edges. Repeat with the second and third cake layers.
- Step 17: Apply a very thin, even layer of frosting over the entire cake to seal in any loose crumbs. Place the cake in the refrigerator for at least 20-30 minutes, or until the crumb coat is firm to the touch.
- Step 18: Once the crumb coat is firm, apply a thick, even layer of frosting to the top and sides of the cake.
- Step 19: Decorate with white chocolate shavings, fresh berries, or edible glitter as desired. Chill the cake in the refrigerator for at least 30 minutes to an hour to firm up the frosting.
Pro Tips for the Perfect Purple Velvet Cake Rich
Keep these in mind:
- Ensure all your ingredients are at room temperature for the best results.
- Don’t rush the cooling process; allowing the cakes to cool completely is crucial for frosting.
- Consider making the cake a day ahead; it gets even better with time.
- Use quality food coloring for the brightest purple hue.
- Experiment with different frostings like cream cheese or vanilla for a unique twist.
Best Ways to Serve Purple Velvet Cake Rich
When it comes to serving, this moist purple cake shines. Pair it with a scoop of vanilla ice cream for a delightful contrast. For a festive touch, serve alongside fresh berries. You can also create a purple velvet layer cake by adding multiple layers of cream cheese frosting between the cake layers for an impressive presentation.
How to Store and Reheat Purple Velvet Cake Rich
To store, cover the cake tightly in plastic wrap and refrigerate. It can last up to a week if properly stored. For meal prep, consider slicing the cake into individual portions and freezing them. To reheat, allow it to come to room temperature before serving, ensuring every bite retains its delicious moistness.
Frequently Asked Questions About Purple Velvet Cake Rich
What’s the secret to perfect Purple Velvet Cake Rich?
The secret lies in the quality of your ingredients and the baking time. Use fresh ingredients and avoid overmixing the batter to maintain the cake’s moist texture.
Can I make Purple Velvet Cake Rich ahead of time?
Absolutely! This cake can be made a day in advance. Just be sure to store it properly to keep it fresh and moist.
How do I avoid common mistakes with Purple Velvet Cake Rich?
To avoid mistakes, make sure to measure your ingredients accurately and follow the baking time closely. Every oven is different, so keep an eye on the cakes as they bake.
Variations of Purple Velvet Cake Rich You Can Try
There are plenty of unique purple velvet cake variations to explore! Consider adding chocolate chips for extra sweetness or swapping out the frosting for a tangy lemon glaze. You might also try using almond extract instead of vanilla for a different flavor profile. This vegetarian cake can be tailored to fit various dietary preferences!
Print
Purple Velvet Cake Rich: 5 Decadent Layers to Indulge
- Total Time: 6 hours
- Yield: 12 servings 1x
- Diet: Vegetarian
Description
A vibrant culinary masterpiece featuring stunning purple cake layers with a tender, moist crumb, generously coated in a luscious, creamy white chocolate frosting.
Ingredients
- 2 ½ cups (300g) all-purpose flour, sifted
- 1 teaspoon baking soda
- 1 teaspoon salt
- ½ cup (113g) unsalted butter, softened
- 1 ¾ cups (350g) granulated sugar
- 2 large eggs, room temperature
- 1 teaspoon pure vanilla extract
- 1 cup (240ml) buttermilk, room temperature
- 1 tablespoon white vinegar
- 2 teaspoons purple gel food coloring
- ½ cup (120ml) hot water, divided
- 1 tablespoon unsweetened cocoa powder
- 12 ounces (340g) good quality white chocolate, chopped or chips
- 2 cups (450g) unsalted butter, softened
- 4–5 cups (480-600g) powdered sugar, sifted
- 1 teaspoon pure vanilla extract
- ¼ cup (60ml) heavy cream or whole milk, cold
- Pinch of salt
Instructions
- Preheat oven to 350°F (175°C). Grease, flour, and line three 8-inch round cake pans with parchment paper.
- Whisk together sifted all-purpose flour, baking soda, and salt. Set aside.
- In a small bowl, whisk 1 tablespoon unsweetened cocoa powder with ¼ cup hot water until smooth.
- Cream ½ cup softened unsalted butter and 1 ¾ cups granulated sugar until light, fluffy, and pale (3-5 minutes). Beat in 2 large eggs one at a time, then 1 teaspoon pure vanilla extract.
- Combine 1 cup buttermilk and 1 tablespoon white vinegar. Stir in 2 teaspoons purple gel food coloring until uniform. Next, stir in the prepared cocoa paste.
- With mixer on low, alternately add dry ingredients and purple buttermilk mixture to the wet ingredients, starting and ending with dry. Mix until just combined; do not overmix.
- Gently fold in the remaining ¼ cup hot water until the batter is smooth and uniformly purple.
- Divide batter evenly among prepared pans. Bake for 25-30 minutes, or until a wooden skewer inserted into the center comes out clean.
- Cool cakes in pans on a wire rack for 10-15 minutes. Invert, remove parchment, and cool completely on the rack.
- Melt 12 ounces chopped white chocolate gently until smooth. Set aside to cool to room temperature.
- Beat 2 cups softened unsalted butter on medium-high speed for about 5 minutes until incredibly light, pale, and fluffy.
- Gradually add 4-5 cups sifted powdered sugar on low speed, beating until fully incorporated after each addition. Increase speed to medium-high and beat for another 3-5 minutes until thick and creamy.
- Stir in 1 teaspoon pure vanilla extract and a pinch of salt. Gradually pour in ¼ cup cold heavy cream or milk, one tablespoon at a time, beating on medium-low speed until frosting reaches desired consistency.
- With the mixer on low speed, slowly pour in the cooled, melted white chocolate. Beat until just fully incorporated and the frosting is smooth and uniform.
- If necessary, use a serrated knife to level any domed tops off the cooled cake layers.
- Place one leveled cake layer on a serving plate. Spread about 1 cup of white chocolate frosting evenly to the edges. Repeat with the second and third cake layers.
- Apply a very thin, even layer of frosting over the entire cake to seal in any loose crumbs. Place the cake in the refrigerator for at least 20-30 minutes, or until the crumb coat is firm to the touch.
- Once the crumb coat is firm, apply a thick, even layer of frosting to the top and sides of the cake.
- Decorate with white chocolate shavings, fresh berries, or edible glitter as desired. Chill the cake in the refrigerator for at least 30 minutes to an hour to firm up the frosting.
Notes
- Prep Time: 2 hours
- Cook Time: 1 hour
- Category: Dessert
- Method: Baking
- Cuisine: American
Nutrition
- Serving Size: 1 slice
- Calories: 550
- Sugar: 50g
- Sodium: 150mg
- Fat: 30g
- Saturated Fat: 18g
- Unsaturated Fat: 10g
- Trans Fat: 0g
- Carbohydrates: 65g
- Fiber: 1g
- Protein: 5g
- Cholesterol: 80mg
