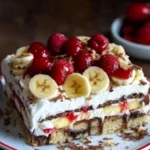
Description
Hey there, dessert lovers! If you’re anything like me, you know that life can get a bit hectic. Between work, family, and trying to remember where you parked the car, finding time to bake a dessert might seem like a tall order. Well, worry no more! This No-Bake Banana Split Cake is here to save the day—and your taste buds. 🍌🍰
Ingredients
Scale
- 2 1/2 cups graham cracker crumbs
- 1/2 cup unsalted butter, melted
- 1/4 cup granulated sugar
- 4 ripe bananas, sliced
- 2 cups whipped cream
- 1 cup chocolate sauce
- 1 cup crushed pineapple, drained
- 1 cup chopped nuts (optional)
- Maraschino cherries (for garnish)
Instructions
- Prepare the Crust: In a mixing bowl, stir together the graham cracker crumbs, melted butter, and granulated sugar. It should have a uniform consistency. Press this glorious mixture into the bottom of a 9×13 inch pan. No need for perfection here—rustic is a vibe!
- Layer the Bananas: Now, lay those beautiful banana slices right on top of your crust. This is where the magic starts to happen!
- Whipped Cream Heaven: Grab that fluffy whipped cream and gently spread it over the banana layer. Feel free to whip it up yourself or take the shortcut with store-bought—no judgment here!
- Add the Goodies: Drizzle that sumptuous chocolate sauce and sprinkle the drained crushed pineapple over the whipped cream. If you’re feeling nutty, toss on those chopped nuts for a delightful crunch.
- Chill Out: Cover the pan with plastic wrap and refrigerate for at least 4 hours—or even overnight if you can wait! This is key to letting those flavors meld and the cake set up perfectly.
- Finish with Flair: Before serving, top off with maraschino cherries. Because, let’s be honest, everything is better with cherries on top!
Notes
- Time-Saving Trick: Using prepackaged whipped cream can cut down on prep time. Just make sure you buy enough!
- Storage Know-How: If you end up with leftovers (good luck with that!), this dessert can be stored in the fridge for up to 3 days—but trust me, it rarely lasts that long!
- Customization is Key: Feel free to add your favorite toppings! Crushed Oreos or a sprinkle of coconut can elevate this dish even more.
