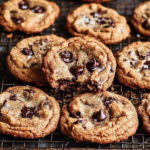
Description
Hey there, cookie lovers! If you’ve ever stood in your kitchen, surrounded by chaos, yearning for a warm, gooey cookie to rescue your day, you’re in the right place! Today, I’m sharing my go-to recipe for Brown Butter Chocolate Cookies that will have your taste buds dancing with joy. These delectable treats combine the rich, nutty flavor of browned butter with generous chunks of dark chocolate, creating an irresistible batch of cookies that’s perfect for any occasion. Trust me, once you try them, they’ll become your secret weapon for impressing guests or simply treating yourself after a long day.
Ingredients
- 3/4 cup unsalted butter (the star of the show!)
- 1 3/4 cups all-purpose flour
- 1/2 tsp baking powder
- 1/2 tsp baking soda
- 1 tsp cornstarch
- 1/2 tsp salt
- 3/4 cup brown sugar (for that lovely caramel flavor)
- 1/4 cup granulated white sugar
- 3 egg yolks (give them a warm hug!)
- 1 tbsp vanilla extract (because everything’s better with vanilla!)
- 1 tbsp heavy cream
- 6 oz dark chocolate bars, chopped into chunks (the more chocolate, the better!)
- Flaky sea salt for sprinkling
Instructions
1. Brown the Butter:Start by adding the butter to a medium saucepan and melting it over medium heat. Keep an eye on it—once it starts bubbling and turns a lovely golden brown (about 5-8 minutes), you’ll experience the glorious aroma of nutty goodness. Yes, your house will smell like a bakery, and no, the neighbors might not forgive you for it! Transfer the browned butter to a bowl and let it cool down a bit
2. Preheat and Prepare: While you’re waiting for that butter to cool, preheat your oven to 350°F (175°C) and line two baking sheets with parchment paper. This is where the magic (and mess!) will happen.
3. Mix Those Dry Ingredients: In a separate bowl, whisk together the flour, baking powder, baking soda, cornstarch, and salt. This is your dry mixture that will help our cookies rise beautifully.
4. The Sweet Mix: Grab that cooled brown butter and pour it into a large mixing bowl. Add in the brown sugar and granulated white sugar, whisking until thoroughly combined. It’ll look a bit liquidy at first, but don’t fret—just keep mixing, and it will come together.
5. Let’s Make It Creamy: Now, it’s time to add the egg yolks, vanilla extract, and heavy cream to the butter-sugar mixture. Whisk away until you achieve a smooth and creamy consistency; it’s as easy as pie… or should I say, cookies!
6. Fold in the Goodness: Gently fold your dry ingredients into the wet mixture until just combined (no overmixing!). This is the part where it gets really exciting: add in those dark chocolate chunks and fold them into your dough. Yum!
7. Scop and Bake: Using a cookie scoop (or a tablespoon if you’re feeling adventurous), place dollops of dough onto the prepared baking sheets, leaving a little room in between for spreading. Sprinkle a few extra chocolate pieces on top if you’re feeling fancy!
8. Shape Perfection: Bake for around 10 minutes, but keep an eye on them—once they’re lightly golden, take them out. If you want perfectly shaped cookies, use a large circular cookie cutter to give them a final shape while they’re still warm (yes, it’s a little extra, but totally worth it!).
9. Cool It Down: Let the cookies cool on the baking sheet for about 5 minutes before transferring them to a wire rack. While they cool, give them a light sprinkle of flaky sea salt for that sweet-and-salty finish.
Notes
- Brown Butter Is Key: Don’t rush this step! The nutty flavor really does transform the cookies.
- Chill Out: If your dough is too soft, pop it in the fridge for about 30 minutes before scooping. It’ll make it easier to handle!
- Don’t Skip the Salt: That sprinkle of flaky sea salt on top is what takes these cookies from delicious to divine.